In the previous tutorial, Rendering Earth in Godot 3.4, I showed how to make a simple Earth model in Blender and import it to Godot. In this post, we’ll explore how to rotate the globe, thus making our “game” interactive.
This is how the node tree and resource tree should look like (adjusted from the previous post to follow Godot’s file naming conventions).
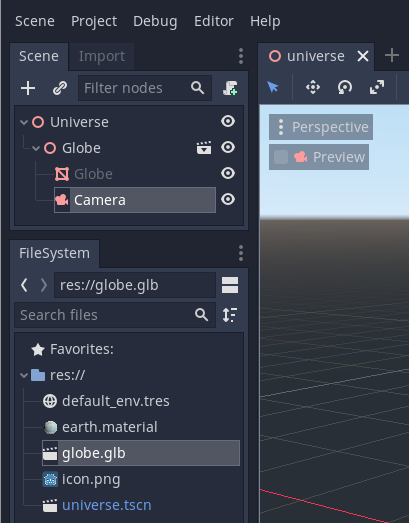
The uneverse.tscn file contains our “Universe” spatial node, and the
globe.glb (imported) file contains the base class for our “Globe” spatial
node. We have also added a camera in the previous tutorial.
Adding simple mouse-click interaction
Now to add some interaction! For simplicity, we’ll keep the globe fixed at the world origin, and instead move our camera around. This will make calculations easier for now.
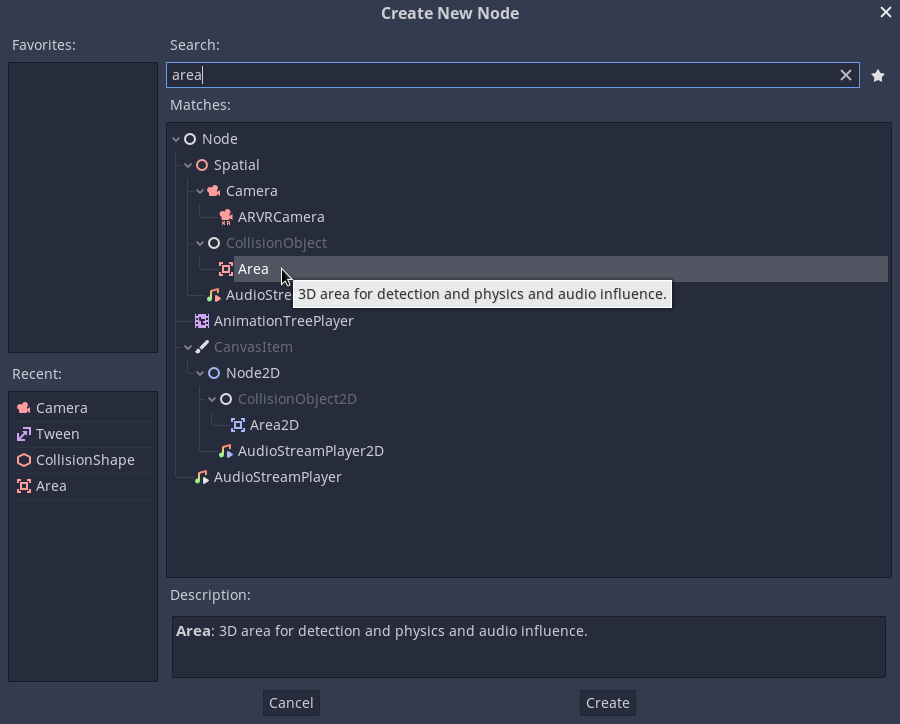
First, let’s add an “Area” to our “Globe” spatial. This will allow us to listen on mouse click events. Right-click the “Globe” spatial in the node tree and select Add Child Node (Ctrl+A). Locate the “Area” class:
Once we add the Area, we’ll immediately get a node configuration warning, telling us that the node has no shape and thus it can’t interact with other objects. Let’s fix that by adding a shape: add a new “CollisionShape” object as a child node of the Area, the same way we added the Area node.
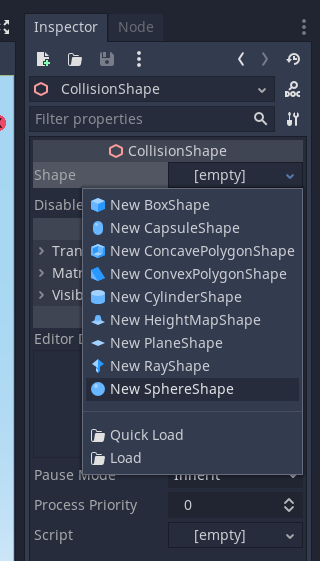
Once we do that, the previous warning will go away, just to be replaced by a new warning on the CollisionShape node, telling us that there is no shape provided. To specify a shape, select the CollisionShape node and pick a shape from the dropdown for the Shape property in the Inspector tab.
Select New SphereShape to create a sphere-shaped collision object. Leave the radius at 1 unit, since that is the radius of our globe.
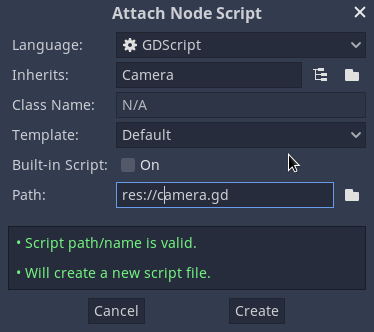
Now that we have a collision shape, we’ll want to connect its input signal to a script where we’ll handle it by transforming the camera. To do that, let’s create a script first by selecting the Camera node in the node tree and pressing the “Attach Script” icon, or selecting Attach Script from the context menu.
Leave the defaults, except rename the script file to camera.gd, because,
naming conventions.
Now select the Area node, and go to the Node panel, which is the tab right
next to the Inspector panel on the right. Under Signals »
CollisionObject, double-click the input_event(…) signal. Click
Connect to connect it to the Camera node.
Once we connect the signal to the Camera node, we’ll get an empty function in
the script that is called every time an input event occurs on the collision
object. In this function, we have a reference to our Camera node (the camera
parameter) and the position on the sphere where the mouse click happened (the
position vector).
We can easily re-orient the camera by calling the
look_at_from_position(…)
method of the camera, which takes three arguments: the new position to move the
camera to, the position to look at, and the “up” orientation.
The new camera position can be obtained by scaling the position vector to the
length of the vector specifying the camera origin:
var distance_from_origin: float = camera.transform.origin.length()
var new_camera_position: Vector3 = position.normalized() * distance_from_origin
Note that we use position.normalized() to re-scale the position to a unit
vector. This wouldn’t be necessary if our collision object was a perfect
sphere, but it isn’t: like everything in our 3D game, it is secretly a
collection of triangles. To avoid small changes in the camera distance, we
normalise the position vector, which really just means we’re interested in the
orientation, but not length of the vector.
Now all that’s left is to call camera.look_at_from_position(…). We want to
keep looking at the globe, so we’ll pass the world origin Vector3.ZERO as the
second argument. To keep the camera orientation so that north is always up and
south is down, we pass Vector3.UP as the third argument.
camera.look_at_from_position(new_camera_position, Vector3.ZERO, Vector3.UP)The final script should look something like this:
extends Camera


func _on_Area_input_event(
    camera: Camera, _event: InputEvent, position: Vector3, _normal: Vector3, _shape_idx: int
) -> void:
    var distance_from_origin: float = camera.transform.origin.length()
    var new_camera_position: Vector3 = position.normalized() * distance_from_origin
    camera.look_at_from_position(new_camera_position, Vector3.ZERO, Vector3.UP)
Now we can hit F5 to test our game. Let’s try to cli… Oh no! What’s happening? The Earth is going nuts!
OK, time to calm down, this is progress. The crazy camera movement is because
all mouse movement is treated as input events, not just the clicks. To ignore
events other than left mouse-click, we can add an if guard:
func _on_Area_input_event(
    camera: Camera, event: InputEvent, position: Vector3, _normal: Vector3, _shape_idx: int
) -> void:
    if event is InputEventMouseButton and event.button_index == BUTTON_LEFT and event.pressed:
        var distance_from_origin: float = camera.transform.origin.length()
        var new_camera_position: Vector3 = position.normalized() * distance_from_origin
        camera.look_at_from_position(new_camera_position, Vector3.ZERO, Vector3.UP)
Re-run the game with F5 and now we can click around the globe, looking at it from various positions.
Animating camera movement
We can now look at the globe from all directions, but wouldn’t it be even nicer
if we could animate the camera movement, instead of jumping to the new position
immediately? Luckily Godot provides a simple helper to do such animations: the
Tween node.
Go ahead and add one to the Camera node. We’ll call it tween and access it via a property in our Camera script:
onready var tween: Tween = get_node("Tween")To use the script, we’ll replace the camera.look_at_from_position(…) call
with a call to tween.interpolate_method(…). Note that we cannot easily use
interpolate_property(…) here because we want to change not just the position,
but also the rotation of the camera transform, while the Tween class only
knows how to interpolate vectors.
First we move our camera transform code to its own method:
func look_from(position: Vector3) -> void:
    look_at_from_position(position, Vector3.ZERO, Vector3.UP)
Note that we’re accessing look_at_from_position(…) directly, without using a
reference to the Camera node. This is possible because our class extends the
Camera class, so we can implicitly access its members, just like in Ruby or
C++ (but unlike in Python, where an explicit self.look_at_position(…) would
be needed). This works because we attached our script to the Camera node.
Now, change the event handling code to use the tween object:
tween.interpolate_method(
    self,
    "look_from",
    camera.transform.origin,
    new_camera_position,
    0.5,
    Tween.TRANS_CUBIC,
    Tween.EASE_OUT
)
tween.start()
The arguments here are:
selfis simply a reference to the current Camera node."look_from"is the name of the method to call.camera.transform.origin(or justtransform.origin) is the current camera position.new_camera_positionis where we want to move the camera.0.5is how many seconds to anemate; half a second seems good enough.Tween.TRANS_CUBICis the transition type. A cubic transition makes for a nice and smooth camera movement.Tween.EASE_OUTmakes the camera slow down when near the target position.
Improving camera animation
Now if we press F5 again, we’ll see that now the camera moves nicely, but there are still a couple of issues:
- The camera gets closer to the Earth as it moves, then back further again.
- As a result, clicking again during the animation progress the animation is restarted from a closer start position, allowing us to drift very close to the earth, or even get inside it with some fast clicking!
- Also, animating around the North and South poles gives for a sudden camera rotation as the camera flies past the poles.
The problems are due to the fact that the interpolated positions are along the closest line from the two endpoints. What we want instead is to keep the camera at a constant distance from the globe.
An easy way to fix that is to interpolate between two unit vectors, and using the result only as an orientation, re-scaling the result each time to keep the distance. Let’s change the input handling code again.
In fact, let’s move all that business out to yet another function, to keep the
handler code simple and clean. At the same time, we’ll change the tween
parameters to interpolate between two unit vectors, and change the look_from
method to treat its input as an orientation, not a position vector.
The final script file now looks like this:
extends Camera

onready var tween: Tween = get_node("Tween")


func look_from(orientation: Vector3) -> void:
    var distance_from_origin: float = transform.origin.length()
    var new_camera_position: Vector3 = orientation.normalized() * distance_from_origin
    look_at_from_position(new_camera_position, Vector3.ZERO, Vector3.UP)


func on_click(position: Vector3) -> void:
    var orientation: Vector3 = transform.origin.normalized()
    var new_orientation: Vector3 = position.normalized()
    tween.interpolate_method(
        self, "look_from", orientation, new_orientation, 0.5, Tween.TRANS_CUBIC, Tween.EASE_OUT
    )
    tween.start()


func _on_Area_input_event(
    _camera: Camera, event: InputEvent, position: Vector3, _normal: Vector3, _shape_idx: int
) -> void:
    if event is InputEventMouseButton and event.button_index == BUTTON_LEFT and event.pressed:
        on_click(position)
F5 again, and yay! We now have a much smoother camera movement, that goes around the globe. It is also no longer possible to clip into the globe by clicking too quickly.
Even better camera animation
One problem still remains: when the camera moves too close to the poles, it does a very quick rotation. This is because the interpolated path between the start and end points go close to the pole where the “up” direction changes rapidly, as the camera flies by.
Let’s look at how Google Maps solves this issue. When we rotate the globe, it seems to animate the latitude and longitude in a way that we don’t actually fly by the poles. We should do this in our game as well, but interpolating two values gets more complicated. Ideally, we’d just use the interpolated orientation vector we already have, but then instead of scaling it up to the current camera distance, we’d first “normalise” it in a way where we only scale up the X and Z components. The Y (“up”) component should stay the same, so we don’t get closer to the poles than the two endpoints of the interpolated vectors.
To do that, we can imagine shearing our vector “outwards”, away from the Y axis, until the point ends up on the unit sphere (i.e. we end up with a unit vector). If \((x, y, z)\) is the current interpolated vector, and \((x_1, y_1, z_1)\) is the unit vector we’re trying to calculate at each frame, we can observe the following relations:
\[\begin{align} y_1 &= y \\ \frac x x_1 &= \frac z z_1 \\ x_1^2 + y^2 + z_1^2 &= 1 \end{align}\]We can extract for example \(z_1\) from that second equation, and use it to extract \(x_1\) from the third equation. The result is:
\[\begin{align} z_1 &= \frac {x_1} x z \\ x_1 &= \pm \sqrt {\frac {1 - y^2} {1 + \left( \frac z x \right)^2}} \end{align}\]Note that in the solution above the sign of \(x_1\) (and consequently the
sign of \(z_1\)) can be positive or negative, but for our camera motion we
want to keep the sign of all coordinates the same. The simplest way to do that
in GDScript is using the
sign
built-in.
Putting it all together, this is how the script file looks like:
extends Camera

onready var tween: Tween = get_node("Tween")


# Updates the camera to look ftowards the globe from a new position.
# Keeps the distance btween the camera origin and the world origin constant.
func look_from(orientation: Vector3) -> void:
    look_at_from_position(
        normalize_keep_y(orientation) * transform.origin.length(), Vector3.ZERO, Vector3.UP
    )


# Normalise a vector by keeping its "y" coordinate unchanged.
func normalize_keep_y(v: Vector3) -> Vector3:
    var x2: float = v.x * v.x
    var y2: float = v.y * v.y
    var z2: float = v.z * v.z

    if v.x == 0:
        # Special-case to avoid a division by zero error below.
        var z1: float = sign(v.z) * sqrt(1 - y2)
        return Vector3(0.0, v.y, z1)

    var x1: float = sign(v.x) * sqrt((1 - y2) / (1 + z2 / x2))
    var z1: float = v.z / v.x * x1
    return Vector3(x1, v.y, z1)


func on_click(position: Vector3) -> void:
    var orientation: Vector3 = transform.origin.normalized()
    var new_orientation: Vector3 = position.normalized()
    tween.interpolate_method(
        self, "look_from", orientation, new_orientation, 0.5, Tween.TRANS_CUBIC, Tween.EASE_OUT
    )
    tween.start()


func _on_Area_input_event(
    _camera: Camera, event: InputEvent, position: Vector3, _normal: Vector3, _shape_idx: int
) -> void:
    if event is InputEventMouseButton and event.button_index == BUTTON_LEFT and event.pressed:
        on_click(position)
Hit F5 one last time, and finally! We’ve got some nice, smooth camera movement that doesn’t go wonkers near the North and South pole.
I hope this tutorial was a nice example of how even some basic algebra can come in handy when doing game development. A future post will go into more detail about field of view, focal length and other camera settings, so stay tuned.